
How to Index Your WordPress Website on Google
If your WordPress site isn’t indexed, it won’t show up in Google search results. Indexing is the process where Google crawls, analyzes, and stores your web pages in its search database. Once indexed, your pages become eligible to appear for relevant search queries.
This guide will walk you through the steps to ensure your WordPress site is indexed correctly, share common troubleshooting tips, and offer best practices to help speed up and improve your indexing process.
What Is Indexing and Why It Matters
Google uses a three-step process to make websites visible in search:
Crawling – Googlebot automatically visits and discovers websites by following links.
Indexing – Once a page is crawled, Google evaluates its content (text, images, meta tags) and decides whether to include it in its index.
Ranking – Google ranks indexed pages based on content quality, relevance, and keyword optimization.
If your page isn’t indexed, it won’t be ranked—or even appear—in search results.
Step 1: Create an XML Sitemap for Your WordPress Site
A sitemap is a structured file that lists all the pages you want search engines to index. This gives Google a clear map of your website.
Use SEO plugins to generate your sitemap easily:
Install Yoast SEO, Rank Math, or All in One SEO via the Plugins menu in WordPress.
Enable the “XML Sitemaps” feature within the plugin settings.
Your sitemap will typically be located at:
https://yourdomain.com/sitemap_index.xml
Alternatively, you can use tools like XML-sitemaps.com to generate one manually.
Step 2: Submit Your Sitemap in Google Search Console
Go to Google Search Console.
Add your site and verify ownership (HTML tag or DNS record).
Navigate to Index > Sitemaps.
Submit your sitemap URL and click Submit.
This tells Google to start crawling and indexing your site.
Step 3: Optimize Your WordPress Site for Indexing
Even with a sitemap, indexing isn’t guaranteed. To increase your chances:
Keyword Optimization
Use tools like Google Keyword Planner or Ahrefs.
Add relevant keywords to titles, headings, meta descriptions, and content.
Use SEO plugins to evaluate and fine-tune keyword usage.
Meta Information
Keep title tags under 60 characters.
Write clear, compelling meta descriptions (150–160 characters).
Use proper header structure (H1 > H2 > H3…)
Content Quality
Provide original, informative, and complete content.
Ensure readability and clean formatting.
Regularly update content to keep it fresh and relevant.
Step 4: Check and Troubleshoot Indexing Issues
Use the URL Inspection Tool
In Google Search Console, paste the URL into the top bar.
See if it’s indexed and request indexing if it’s not.
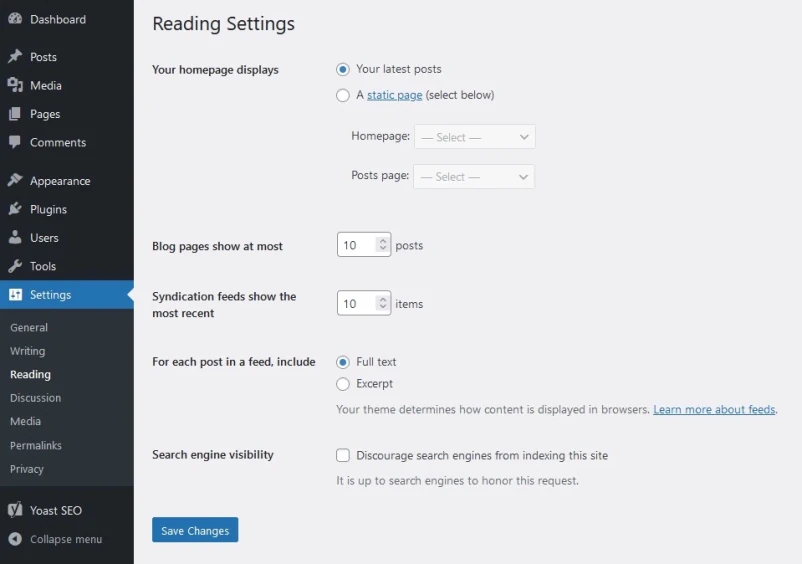
Check WordPress Search Engine Settings
Go to Settings > Reading in your WP dashboard.
Ensure “Discourage search engines from indexing this site” is unchecked.
Review Your robots.txt File
Visit
https://yourdomain.com/robots.txtEnsure important pages are not being blocked by
Disallowrules.Use Google Search Console’s robots.txt tester to validate.
Want Faster, Hassle-Free Indexing?
Manual indexing takes time and effort. That’s where IndexPro.dev comes in.
IndexPro.dev is a smart automation tool that:
Submits and re-checks your URLs across Google and multiple search engines.
Detects deindexed pages and resubmits them automatically.
Supports sitemaps, individual URLs, and real-time tracking.
Works with official APIs for safe and fast results.
Get your WordPress site indexed within hours—not weeks.
✅ No coding. No guesswork. Just automated indexing done right.